Hi, I am Aria, welcome to my life!

Prosthetic Gait Training at Home: Exercises Before Your First Walk
Before Your First Prosthetic Step: The At-Home Exercises Most People Skip


Prosthetic gait training at home can make your first walk on a new leg feel far less intimidating. A few simple, controlled exercises can build the strength and balance you need while you wait for your care team’s go-ahead.
This guide walks you through a practical setup, from choosing a sturdy counter to practicing weight shifts, seated leg lifts, and hip work. You’ll also learn how to check your residual limb’s skin before and after each session, and which warning signs mean it’s time to stop. Read on for a clear, step-by-step plan you can start today, plus a preview of what to expect once your clinician says it’s time to walk.
Quick Answer
- Walk only after your care team confirms readiness; ask your prosthetist or physical therapist to tailor your exercises.
- Build core, back, hip, and residual-limb strength with 6–12 controlled repetitions, resting between sets.
- Practice supported weight shifts toward the prosthetic side, returning to center; use a mirror to check even posture.
- Try brief supported single-leg stance only if prescribed, keeping both hands on a sturdy counter or chair.
- Check skin and socket fit before and after practice; stop for pain, lasting redness, irritation, dizziness, or unusual fatigue.
Prepare for Prosthetic Gait Training
As an amputee, I prepare my body before I ask my prosthesis to do the heavy lifting.
I treat preparation as real training that deserves the same care as the walking itself.
Walking takes more energy with a prosthesis, and people with a transfemoral amputation may need up to 50 percent more.
So I build strength first and distance second, because my lungs prefer a gentle start.
I start with my abdomen, back, hips, and residual limb muscles.
I do six to twelve repetitions of each exercise, in two or three sets.
When a movement feels controlled, I add a resistance band or light weights.
I keep the load light until my form stays steady.
Balanced strength supports steady steps and safer weight transfer, which is the shift of pressure from one leg to the other.
I plan each session around my energy level, and enthusiasm alone never sets the pace.
Color-coded resistance levels help me choose the right band tension to match my current strength and comfort needs during these exercises.
Healthy skin on the residual limb and a comfortable socket fit matter at every stage of training.
I check both before each session and adjust my plan when either one needs attention.
I practice when I’m rested, and I stop if pain or fatigue gets worse.
I keep a sturdy chair nearby during balance work so I can sit down right away.
I ask my prosthetist to tailor these exercises to my needs.
I build steadily, and I walk only when my care team confirms that I’m ready for safe, steady progress.
Check Your Residual Limb Before Practice
As an amputee, I check my residual limb and socket fit before every practice session. A sore spot can turn a good training day into a very short one.
I look for redness, blisters, cuts, dampness, or tender spots. Redness that lasts, broken skin, heat, or new pain means I stop and call my prosthetist or care team.
Skin needs care before I put on my prosthesis. I wash and dry my residual limb first, then check that no lotion, lint, or wrinkle sits under the liner. After drying, I apply a moisturizer at least twice daily, and it is wise to patch-test new formulas for 48–72 hours to watch for any reaction before broader use.
Before putting on my prosthesis, I wash and dry my residual limb and check for lotion, lint, or wrinkles under the liner.
Stump volume changes through the day as I move and sweat. So I check that the socket feels snug, not pinching or loose.
If the fit changes, I follow my prosthetist’s sock ply instructions. I write down anything unusual, then practice only when my skin and fit look right.
Set Up a Safe Prosthetic Gait Training Space

I clear my walkway before every practice session because I know how easily a trip can happen. I move rugs, cords, and clutter out of the way so my prosthetic foot and residual limb have less to manage.
Next, I set a sturdy chair on a floor that grips well and keep it within arm’s reach for balance work. Having a chair close by gives me something solid to hold when my weight shifts onto my prosthetic leg during stance phase.
Before I begin, I check that the chair doesn’t slide across the floor. A chair that wanders can’t act as a spotter, and a fall during gait training can set back your progress for weeks.
Adding a mat with a non-slip rubber backing under the chair gives me extra traction on wood, tile, or low-pile carpet.
Clear Walkways
A clear walkway was the first piece of gait training equipment I set up at home after my amputation. It’s also the best part, because it doesn’t need batteries.
A prosthesis can catch on cords, shoes, or rug edges, so I started with a straight, bright route from room to room.
I moved small furniture out of the way, coiled my charging cables, and removed loose mats. An open floor lets me focus on each step instead of watching for clutter.
In the hall, I cleared away shoes and bags to prevent trips. Along the main route, I removed cords and rugs so my steps stayed predictable.
I added a nightlight that plugs into an outlet, which cost about $5 to $15. I check the path in daylight and again after dark, since lighting changes how I see edges and floor patterns.
Before each practice session, I walk the route slowly while wearing my prosthetic leg. If anything shifts, I move it right away.
My prosthetist recommended this setup for safer gait training. A tidy path also lowers my fall risk during early weight shifts and stance phase practice, so I can build confidence step by step.
One-handed dressing options like zipper pulls can also help me adjust clothing straps or pockets before practice without needing extra assistance.
Stable Chair Support
As an amputee, I keep a sturdy chair within reach for balance practice at home. It’s simple support that I rely on every time I train.
Choose a chair that won’t slide, tip, or swivel when you lean on it. Check the feet on hard floors, because smooth feet can skate across tile or wood.
Skip folding chairs and wheeled desk seats, since they can move at the wrong moment and throw off your balance. Pick a seat height that matches your knee, usually 17 to 19 inches for adults.
This height lets you sit and stand without a deep squat, which puts less strain on your residual limb and prosthesis. Before each session, press down on the seat and test it with your full weight.
If the chair shifts, place it against a wall for extra stability. Keep your hands free so you can grab the chair or a counter if you start to lose your balance. For added support during transitions, consider a double-handle stand assist rated for 450 pounds that fits around your couch.
Ask your prosthetist or clinician how much support to use during practice. A stable chair helps a lot, but it doesn’t replace supervised training with a physical therapist.
Choose something sturdy and plain, because plain chairs tend to stay put.
Practice Balance During Prosthetic Gait Training
When I first learned to walk on my prosthesis, I found that balance depended on where my weight sat. Leaning away from my prosthetic leg threw off my whole body, so I trained myself to share my weight evenly between both legs.
Stand between two sturdy chairs for support. Use a mirror to check that you aren’t favoring one side or shifting your hips toward your sound leg.
Practice a short standing balance on your prosthetic leg each day. Hold a chair as you need it, and stop before your residual limb starts to tire.
Check that your socket fits snugly before each session, since a loose socket can shift your balance without you noticing. I found that steady practice builds more control than trying to wobble through long sessions.
This controlled practice also sharpens your proprioception, which is your inner sense of body position that supports surer steps.
Equal Weight Distribution
Equal weight on both legs is the main goal of this exercise. I want to know whether my prosthetic side takes its share of my body weight or whether my sound leg does nearly all the work.
This is an asymmetry assessment for uneven loading. It shows me how my weight moves through my socket and prosthetic foot while I stand.
During weight acceptance training, I shift toward my prosthesis, pause, and return to center. I keep each movement small and controlled, and I use my prescribed support every time. If I need extra help, I can use a wheeled sit-to-stand lift with a 400 lb capacity to assist with controlled transfers out of a chair before practicing my standing balance.
I stop right away if I feel pain, skin irritation, dizziness, or socket pressure. Any of these signs means I need to rest and check my residual limb before I try again.
I focus on feeling steady contact through my prosthetic foot. I pay attention to whether the foot takes weight evenly from heel to toe.
I compare both sides across several tries to track my progress. Over time, I want the prosthetic side to carry a load that matches my sound side.
I practice this at home under supervision before I add any walking distance. My prosthetist or physical therapist checks my form during each session.
I keep working on these checks until both legs carry a similar load. Each session brings me closer to that balance.
Supported Standing Practice
Supported standing is my next step with my prosthesis.
I hold onto two sturdy chairs or a fixed kitchen counter for support.
Both hands stay on the support. My feet sit about as far apart as my hips, and my knees stay relaxed.
I shift some weight onto my prosthetic side, pause for a few seconds, and then return to center. These small moves teach my body to control balance.
A mirror shows me if I lean or favor one side. I check it often so I can correct my posture.
I stop right away if I feel pain, dizziness, or skin rubbing on my residual limb. Good skin care and a secure socket fit matter just as much as balance practice. Elevating the limb on a positioning wedge during rest breaks can help reduce swelling and improve comfort.
If anything feels loose or sore, I sit down and call my prosthetist. I make that call before I try again.
My plan is simple: I practice near a stable support, with a helper at first. I build confidence here before I start walking.
Daily Single-Leg Stance
As a transtibial amputee, I practise a daily single leg stance to build balance on my prosthetic leg. I briefly lift my sound foot while my prosthetic foot stays planted, with both hands on a sturdy counter or chair.
The goal is weight acceptance, so my prosthetic side carries my body weight instead of my sound leg taking over. I start by holding the stance for 5 to 10 seconds, then rest and repeat it three times. I keep my hips level the whole time.
If I wobble, I grip the chair right away instead of attempting a brave hop. A firm grip on the counter is always safer than a fall.
I practise in front of a mirror to check that my weight is even across both legs. I stop if I notice pain, skin irritation on my residual limb, or unusual fatigue.
I add time gradually as my balance improves, and I only do so when each stance feels controlled. If I’m unsure about my progress, I ask my prosthetist or physical therapist. I always keep a chair close by.
Build Strength for Prosthetic Gait Training
When I started learning to walk on my prosthesis, I found that strength has to come before distance. A steadier body makes prosthetic gait training safer and easier to control.
I began with short sessions beside a sturdy counter, holding on for balance. I kept each session brief so I could stay focused on my form.
My routine was two or three sets of six to twelve slow seated leg lifts, with a short rest between sets.
If you want to do these drills without your prosthesis, ask your clinician first. Friction from a bare residual limb can cause skin problems quickly.
Check your residual limb before and after each session. Follow your stump care routine, and stop if you see redness that lasts or broken skin.
Walking with a prosthesis takes more effort than most people expect. Energy conservation matters, so I save my energy for safe and steady steps.
Ask your physical therapist or prosthetist to change the drills if your pain, fatigue, or balance gets worse. Finishing every set matters less than keeping your body safe.
Practice regularly, stop before your form slips, and add distance only when your therapist says you’re ready. Taking time now helps your first walks feel controlled instead of chaotic.
Strengthen Your Hips, Core, and Arms
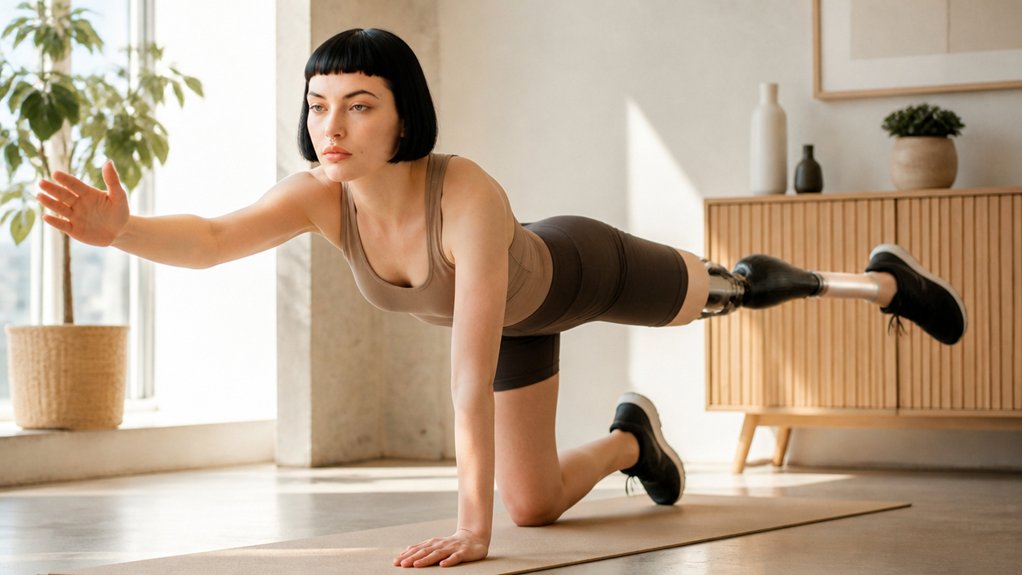
Strong hips, a steady core, and trained arms make walking with a prosthesis easier to control. Balance depends on your whole body, so I build these muscles at home before I rely on my prosthesis.
An elastic resistance band is a simple tool for training your hip extensors and abductors. Hip extensors move your leg back, and abductors move it out to the side.
Start with 6 to 12 repetitions, rest, and then repeat for 2 or 3 sets. Use a light band, keep each movement slow and steady, and ask your physical therapist to check your form.
Tighten your abdomen and lower back, hold for a few seconds, and then release. A steady trunk helps you stay upright when you stand and step on your prosthesis.
Light presses and rows train your arms for support and transfers, such as moving from a chair to a bed. You don’t need heavy weights or a bodybuilder’s routine to build the strength you need.
Stand between two chairs in front of a mirror and practice your balance. Watch for any lean to one side, and correct your posture before you move on.
Stop the exercise if you feel pain or notice skin irritation on your residual limb. Follow the advice of your prosthetist and physical therapist, start light, stay consistent, and let good form set your pace.
Practice Steps in Prosthetic Gait Training
I start my prosthetic gait training with a structured practice plan rather than a solo walk across the living room. I learned the hard way that confidence can move faster than good judgment.
At home, I practice beside a sturdy kitchen counter or between two stable chairs. My prosthetist stays nearby until they approve me to train on my own.
I begin with weight shifts. I rock my weight from one leg to the other while my hands rest on the counter, so my residual limb gets used to how the socket feels under load.
Then I take short forward steps. I place the prosthetic foot fully on the floor before I bring my sound leg through.
A mirror helps me check my posture. I watch for leaning away from the prosthetic side, and I aim for similar stride lengths and a steady pace on both sides.
I stop when I notice pain, skin rubbing, dizziness, or unusual fatigue. Prosthetic walking takes extra energy, so I rest before my form starts to slip.
Small wins build trust in my prosthesis. Each controlled step teaches my body and my balance something useful.
I work in bouts of six to twelve controlled steps. I repeat each bout two or three times and take a seated break between rounds.
I keep a simple motivation log. Each entry lists the date, the number of steps, how comfortable I felt, and one win from the session.
I move to harder drills only with my clinician’s approval. That rule keeps my practice safe and sensible at home.
Turn Safely With Your Prosthesis
When I turn, I start from my hips and let my prosthetic leg guide the movement. I keep my sound leg from doing all the work.
I take small, controlled steps so my balance stays steady. I go slowly and focus on control, because hurrying is where most of my balance problems start.
Shift your weight onto your prosthesis before you move your sound foot. This keeps your prosthetic knee stable and your socket snug against your residual limb.
Turn From Your Hips
Turn From Your Hips
When I change direction, I let my hips and prosthetic leg guide the turn so my sound leg shares the load. I keep my steps small, rotate my pelvis (the bowl-shaped area above your legs), and look toward where I am going.
My residual limb and socket move with my hip, so I feel the turn through my whole pelvis. Hip rotation helps me turn smoothly. Pivot control means I manage the turn without twisting sharply.
| Try | Focus |
|---|---|
| Stand tall | Relax shoulders |
| Shift gently | Keep hips level |
| Turn slowly | Pause, reset |
I start with a quarter turn, then return to center. I repeat this six times.
If I feel wobbly, I stop and hold the counter. My goal is control, so I take my time with each turn.
I practice beside a counter once my therapist approves it. I ask my clinician to check my form as I keep practicing the motion.
Use Your Prosthetic Leg
When I make a turn, I shift my weight onto my prosthetic leg so my sound leg doesn’t have to do all the work. I turn from my hips and keep my upper body balanced over both legs.
This saves energy and helps limit muscle fatigue, especially when I move around the kitchen or down the hallway.
Keep each step small and steady. I lean on a countertop or wall when my balance feels uncertain.
I check my socket before I stand up to walk. The socket is the fitted cup that holds my residual limb, so I make sure it feels secure and the skin stays comfortable.
If I notice pain, slipping, or skin irritation, I stop and contact my prosthetist right away. Sharing the work of the turn between both legs keeps me steady.
Practice Controlled Turns
Slow, planned turns are safer than trying to pivot in one quick move. I learned that as an amputee, and my kitchen floor paid the price.
Before you practice, clear a wide space beside a sturdy counter. Wear the shoes you normally use along with your prosthesis, since a change in shoe height can throw off your balance.
Keep one hand on the counter for support, with your feet apart and your weight centered over both legs. To turn, take several small steps and move your feet and hips together.
Hip rotation means turning your pelvis as one unit with your legs, so the turn comes from your hips. Start with quarter turns, first toward your prosthetic side and then toward your other side.
Pivot drills can strain the skin on your residual limb and stress your joints, so only try them with your therapist’s approval. When you do, practice three to five turns each way and stop if you feel pain, rubbing, or dizziness.
A mirror helps you check that your shoulders stay level during each turn. Slow breathing keeps your movements calm and steady.
Avoid tight corners and uneven floors until your turns feel controlled. Build control before you try longer distances.
Progress Prosthetic Gait Training at Home
The safest way I’ve found to progress prosthetic gait training at home is to build one skill at a time. Turning the living room into an obstacle course only raises my chance of a fall.
I build prosthetic gait skills one at a time at home, rather than risk a fall with an obstacle course.
I keep each practice session short and steady. I stay close to a kitchen counter or a sturdy chair, and I keep my hands ready to grab on if I lose my balance.
Each week, I add only one challenge, such as a few more steps or a little longer standing time. My residual limb and prosthetic socket need time to adjust to the added load.
If pain, skin redness, or fatigue shows up, I stop and call my prosthetist or physical therapist. Progress counts, and so does a healthy residual limb.
I start each session with equal weight on both legs. I stand in front of a mirror so I can spot any lean toward my prosthetic side or my sound side.
Then I do 6 to 12 controlled repetitions of hip and core exercises, resting between sets. These exercises strengthen the muscles that help me swing my prosthetic leg through each step.
I also care for my hip flexors. Gentle stretches and good positioning help prevent tightness that can affect my gait and my socket fit.
I pace each session for energy conservation. I rest before I feel worn out, because fatigue leads to poor alignment and more stumbles.
I keep a log of time, comfort, and skin changes after each session. Writing these details down helps my prosthetist see patterns I might miss.
I move to the next challenge only with my clinician’s explicit approval. Until then, I keep practicing at the same level with care.
Practice Stairs and Obstacles With Support
I practice stairs one careful step at a time, and I only do it with a sturdy handrail and my therapist’s go-ahead.
A support person stands nearby, because pride makes a poor safety net.
I follow the rule my therapist taught me. I lead upstairs with my stronger leg, and I step down with my prosthetic leg first.
That order steadies me on each step. I place each foot deliberately instead of rushing to finish.
I keep one hand on the rail and look at each step before I move. My support person stands close without pulling me, so I keep my balance on my own.
When I feel tired, I stop and rest. Fatigue can make even familiar steps feel unsafe, and a tired residual limb can throw off my balance.
For obstacles, I start with a stable object, such as a rolled towel on the floor. Then I practice lifting my prosthetic foot over it.
Obstacle clearance means I’ve enough space to pass the object without catching my prosthetic toe. I hold a counter or the back of a sturdy chair for support while I practice.
I raise the height only when my therapist agrees. Each new height gives my therapist and prosthetist a chance to check my gait and how my socket feels.
Frequently Asked Questions
Why Does Walking With a Prosthesis Require More Energy?
Walking with a prosthesis requires more energy because your limb cannot rely on natural ankle and foot movement to absorb shock and push off the ground.
Your body compensates with abnormal gait mechanics and extra muscle recruitment, so every step becomes less efficient than before.
As an amputee who works closely with prosthetic users, I have seen how quickly fatigue builds when alignment is off. A practical tip you can use today is to shorten your stride slightly and increase your cadence, which reduces hip and back strain over long distances.
Ask your prosthetist to check socket fit and pylon alignment at your next visit, since small adjustments can significantly lower the overall energy expenditure of walking.
How Much Extra Energy May Transfemoral Amputees Use While Walking?
Transfemoral amputees may use up to 50% more energy while walking than non-amputees, mainly because a prosthetic knee and foot require more effort to control. I have worn a prosthesis above the knee myself, so I know how quickly that extra effort adds up over a day.
Your energy expenditure depends on your residual limb length, socket fit, and overall fitness. A well-fitted socket and a microprocessor knee that adjusts to your pace can noticeably reduce the metabolic cost of each step.
Try this today: walk on a flat path at a comfortable pace for five minutes, then rate your fatigue from one to ten. Repeat the test after a week of short, consistent walks.
How Can I Manage Fatigue During Prosthetic Gait Practice?
Managing fatigue during prosthetic gait practice comes down to pacing your sessions, taking planned breaks, and stopping before pain or dizziness sets in. Short, focused sessions work better than long ones that leave your residual limb and core worn out.
Try a simple timer today: walk for 10 minutes, then rest seated for 5 minutes before continuing. Over time, extend the walking block as your endurance improves.
Hydrate before you start and keep water nearby, since dehydration makes muscle fatigue and dizziness worse. Keep a short log after each session noting duration, rest breaks, and any skin or pain changes.
Bring that record to your prosthetist or physical therapist so they can adjust your training plan.
Should I Combine Individual Training Sessions With Group Instruction?
Yes, combining individual coaching with group instruction usually gives you the best results. Your clinician acts as your compass, pinpointing gait flaws and fitting adjustments that a group class can’t address.
Group sessions, on the other hand, provide real-world practice and the encouragement of people who understand what you’re going through. Before you commit to a schedule, weigh the cost benefit of each option against your budget and insurance coverage.
Then set up a simple home practice routine: spend ten minutes daily walking a hallway with your prosthesis, counting steps and focusing on even heel strikes. Ask your clinician to review that routine at your next visit.
How Does Overall Health Affect Learning to Walk With a Prosthesis?
Overall health affects learning to walk with a prosthesis by determining how much energy you have for practice and how well your body handles the work. Cardiorespiratory fitness and metabolic conditioning help you meet the higher energy demands of walking on a prosthetic leg, which often takes far more effort than walking on two natural limbs.
Strength in your hips, core, and remaining leg, along with healthy residual skin, keeps daily practice steady and confident. Check your residual limb each evening for redness or rubbing that lasts more than 30 minutes after you remove your socket.
Pair your clinic gait training with daily walking, cycling, or swimming to build the stamina you need.
Rounding Up
Start small, and keep safety in the lead. I’d check my residual limb, clear a safe practice space, then work on balance, strength, short steps, and turns before adding stairs or obstacles with support. Think of each skill as a rung on a ladder, not a race to the roof. I’d follow my prosthetist’s advice, pause for pain or skin changes, and ask for help when needed. That’s the safest route toward a steadier first walk.
References
- https://www.momentum.nu/wp-content/uploads/2023/04/2015-01-13-Momentum-Amputee-Training-Tips-Leaflet.pdf
- https://ouhsc.edu/bserdac/dthompso/web/gait/pobmk/earlygt/earlygt.htm
- https://www.icrc.org/sites/default/files/external/doc/en/assets/files/other/icrc_002_0936.pdf
- https://www.ouhsc.edu/bserdac/dthompso/web/gait/pobmk/ampex.htm