Hi, I am Aria, welcome to my life!

How to Stop Limping With a Prosthetic Leg
Stop Limping Fast: The Prosthetic Walking Fix Pros Swear By


Learning how to stop limping with a prosthetic leg starts with knowing what’s causing it. Most limps come from a socket that doesn’t fit well, misaligned components, or compensating for weak balance, and all of these can be fixed.
Start by checking your socket and alignment with your prosthetist, then practice short, steady walks with your physical therapist instead of forcing your way through discomfort. This guide covers how to spot early fit trouble, build balance and stamina, and shift your hips over your prosthesis so your stride feels smoother. Keep reading for the step-by-step routine, the warning signs to track, and the common mistakes that keep people stuck in a limp.
Quick Answer
- Track when limping starts, how far you’ve walked, any pain, and changes in socket comfort; share this with your care team.
- Ask your prosthetist to check socket fit and alignment if you notice slipping, pinching, persistent redness, or uneven steps.
- Build hip, core, and balance strength with therapist-approved exercises before increasing walking practice.
- Practice short, steady steps with a physical therapist, keeping your posture upright and shoulders level.
- Increase walking gradually only when balance and skin remain comfortable; stop for pain, skin irritation, or unsteadiness and report it.
Why Am I Limping With a Prosthetic Leg?
When I first walked on my prosthesis, I limped almost every time I got tired. A limp usually means your residual limb, your prosthesis, or both need an adjustment.
Common causes include weak hips and core muscles, poor balance, low stamina, pain, and the simple fact that walking on a prosthetic leg takes practice. Fatigue often shortens the stride and makes the upper body lean to one side, especially after a long morning of errands. Graduated compression in a properly fitted shrinker can help reduce swelling that might otherwise throw off your socket fit and worsen a limp.
Start by tracking when the limp begins, how far you have walked, and whether pain is driving your steps. I also keep a short note of how my socket feels at the end of each day.
Track when your limp begins, how far you’ve walked, whether pain is involved, and how your socket feels.
Ask your prosthetist or physical therapist to watch you walk. A trained clinician can spot gait problems that you can’t see for yourself. A mirror is a poor coach for this job.
Build your strength and balance with supervised sessions before you add distance. Rest before your form breaks down, because a tired body picks up bad habits. Increase your walking time slowly, one small step at a time.
Report pain, redness, blisters, or any skin changes to your prosthetist right away. Your residual limb changes over time, and a small fit problem can turn into a painful sore quickly.
Accepting life as an amputee takes time, and I’ve had hard days that felt like setbacks. A bad day only shows that the day was hard. Lean on friends, family, or other amputees who understand what you’re going through.
Could Fit or Alignment Be Causing My Limp?
Yes, a poor socket fit or prosthetic alignment can cause a limp. I’d ask my prosthetist to check both before I try to walk through the limp on my own.
A socket that’s too loose lets my residual limb shift with every step. A socket that’s too tight presses on the skin, throws off my balance, and makes each step feel awkward, as if the socket has opinions of its own.
I watch for rubbing or redness that lingers after I take the socket off. I also notice when the socket stops holding my limb as securely as it did before, and I call my prosthetist right away. I keep an eye out for slipping or pinching as warning signs that my liner or socket fit has changed.
Alignment matters too. Small changes to foot position, socket angle, or the knee flexion setting can change my step length and make me sway or hurry.
My prosthetist watches me walk from the front, side, and back. We then adjust one issue at a time so we can see which change actually helps.
Guessing at home only makes the limp harder to track down.
How Can I Prepare for Walking With a Prosthetic Leg?

I built strength and balance before I ever stood up on my prosthesis. My prosthetist and physical therapist gave me simple trunk, hip, and standing exercises, and I practiced them while holding a sturdy counter or the parallel bars.
I asked my care team to check my fitness before my fitting. A cardiopulmonary exercise test shows how well your heart and lungs handle effort, and that result tells the team whether you’re ready for gait training.
If you need more conditioning first, a supervised exercise program can build it. Once your socket fits well, practice shifting your weight from one side to the other before you take your first step. For residual-limb discomfort during this preparation, red light therapy using 660 nm red and 850 nm near-infrared wavelengths may support tissue recovery and ease socket-related aches.
Build Strength and Balance
Before I walk on my prosthesis, I build strength and balance with guidance from my rehab team. Strong muscles help me control my trunk and ease strain as I move.
Core stability work targets my abdominal and back muscles. These muscles keep my upper body steady over my prosthetic leg, so I move with less effort.
My physical therapist shows me safe moves and simple exercises. I practice only the moves she approves, and I repeat each one slowly at home while breathing normally.
Balance drills prepare me to stand on one leg, shift my weight, and trust my support. I use parallel bars or a sturdy kitchen counter to hold on to while I practice. I can also use a wobble board to sharpen my proprioception and build confidence through controlled tilting.
I keep both legs moving comfortably during each drill. If I feel pain or dizziness, I stop and rest before I try again.
Short, regular sessions work better than long workouts that leave me sore for days. I build up slowly, one step at a time.
My therapist checks my form before I add harder tasks. Once my strength and balance improve, my team moves on to gait training with my prosthesis.
Assess Fitness Before Fitting
As an amputee, I ask my rehab team for a fitness test before I get my prosthesis. The test measures how well my heart, lungs, and muscles handle effort.
It shows whether I’m ready to walk with a prosthesis or need more conditioning first. During the test, a clinician checks whether I can keep up about 50% of my predicted VO2max on a bike that I pedal with one leg.
If I use an arm bike instead, the target is 30 watts. VO2max is the most oxygen my body can use during hard exercise.
These numbers give my team useful clues for the next step. They help us plan my care with my prosthetist.
If my stamina falls short, I can build it with supervised exercise. Studies show gains after six weeks of training.
Along with endurance work, I keep my hips moving, strengthen my trunk, and practice balance. These skills help me walk with more control once my prosthesis is on, since a strong core keeps my body steady over the prosthetic foot. A 360-degree swivel on a cane-mounted light can help reveal shadows and pavement cracks during evening walks as I adjust to my new gait.
My plan is simple: I test first, train where I need to, and then get fitted.
How Do I Shift Weight Onto My Prosthetic Leg?
When I first learned to shift my weight onto my prosthetic leg, I started small in the parallel bars with my physical therapist nearby. My goal was steady pressure on my residual limb inside the socket.
I keep my sound foot planted on the floor. Then I move my hips sideways over the prosthetic side until the socket takes gentle load.
My shoulders stay level so they don’t steal the show. Keeping my pelvis level matters most.
I watch my belt line in a mirror, or I ask my therapist to check it, because a dipping trunk tips my weight to the wrong side. If I see my body lean toward the prosthesis, I correct it right away.
I hold the bars lightly and let my hips do the work. I never pull myself across with my arms.
Once I reach the side, I pause for three seconds and breathe. Then I return to the center.
I repeat this five times, if my therapist approves that number for the day. If I feel pain, buckling, or skin pinching, I stop and ease off. Persistent redness or pain 15–30 minutes after wear may signal a need for more padding or a different interface.
I then tell my therapist or prosthetist what happened, so they can check the fit and alignment of my prosthesis. Reporting these signs early protects my residual limb and keeps my training on track.
My target right now is steady, comfortable pressure through the socket. I don’t need a deep lean to make progress.
Smooth, controlled movement builds the balance and confidence I need for walking.
How Can I Practice Walking With a Prosthetic Leg?
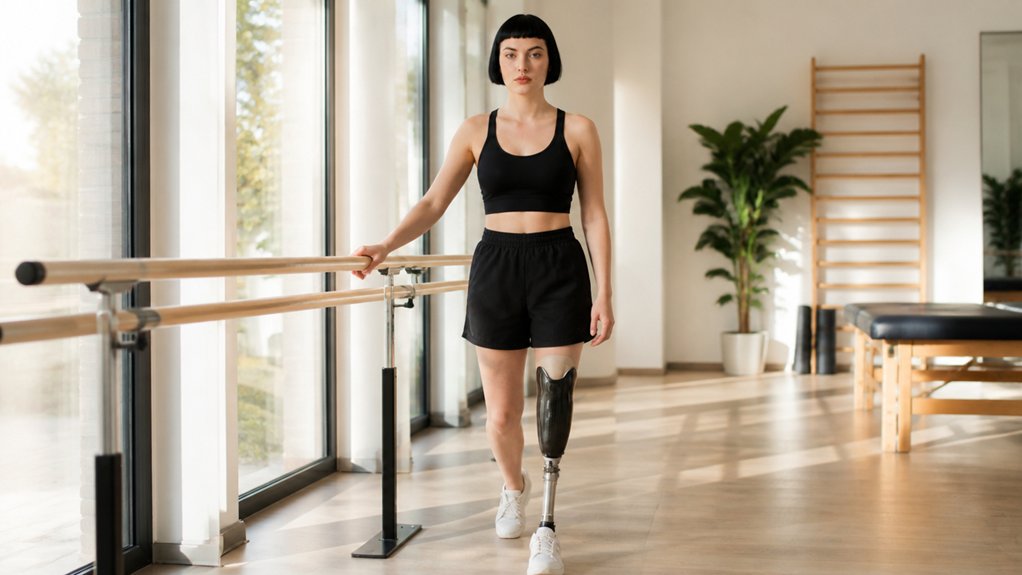
The safest way for me to practice walking with my prosthetic leg is to start in parallel bars with my physical therapist. I build up to longer practice only as my balance improves and my residual limb skin holds up.
During early gait training, I stand tall and shift my hips over my prosthesis. I take short, steady steps inside the bars.
I keep my shoulders level and look straight ahead. I let my sound foot pass close to my prosthetic foot on each step.
My therapist watches for leaning, uneven steps, and poor alignment. Mirror therapy helps me catch habits I miss by showing my posture and weight shifts in a reflection.
At home, I practice beside a sturdy counter, but only after my therapist approves. I keep my walking aid close by.
I stop right away if my residual limb skin gets sore, my pain rises, or I feel unsteady. Then I report it to my therapist before my next session.
My socket should fit snugly, so I tell my prosthetist about any rubbing. Parallel bars may feel tedious, but they give me a secure place to hold on when I need support. I can also use a high-density foam roller on my residual limb to help reduce pain and improve flexibility between practice sessions.
How Do I Build Walking Time With My Prosthetic Leg?
I build my walking time one small step at a time. I add a little more only when my balance, my energy, and my residual limb skin can handle it.
I start with short, planned walks on my prosthesis. After several comfortable sessions, I add a few minutes. I aim for steady progress, since sore skin and shaky legs do not help me get stronger.
My training stays steady. I rest between walks, and I use a walking aid such as a cane or parallel bars when it helps me bear weight through my prosthetic leg. For extra stability during longer sessions, I may switch to forearm crutches with cushioned grips that support my weight through my arms.
| What I notice | What I do |
|---|---|
| Skin stays calm | Add two minutes |
| Tired, but still steady | Rest, then repeat |
| Balance feels shaky | Shorten the walk |
| I finish a walk with a small win | Count it as a win |
Fitness targets can guide my planning. My prosthetist or physical therapist may run an exercise test to show how much work my body can handle safely.
I move up to a longer walk only when daily walking feels manageable. I follow a simple rule: I repeat an easy week before I make my walks longer. Patience gets me further than rushing does.
When Should My Prosthetic Team Check My Gait?
As an amputee myself, I want my prosthetic team to check my gait early. The best time is when training begins, and rehabilitation should start within five working days of getting my leg.
At that first visit, I’ll ask the team to record a walking baseline. They should measure step length, walking width, trunk lean, arm swing, and how evenly I load the prosthesis.
This gives us a fair comparison later. Without numbers, I’d only rely on memory, and memory is a poor judge of how I walked last month.
Scheduled reviews should follow as my walking time grows. I also want a check after any change to my socket, knee, or alignment.
I will ask for an extra visit if I start taking short, quick steps on my sound side. The same goes for leaning toward the prosthesis or feeling skin soreness that lasts after a walk.
These signs often point to a poor socket fit or a balance problem. The team can watch me from several angles in the clinic.
Once it’s safe, they should also check me on ramps and outdoors, where the ground changes under my feet. I want the team to catch a limp before it becomes a habit.
A short review early can catch small problems before they grow. A small adjustment now is easier than a wobble later, and it saves me effort down the road.
Frequently Asked Questions
Can Fitness Testing Help Predict Whether I’Ll Walk Successfully With a Prosthesis?
Yes, fitness testing can help predict whether you will walk successfully with a prosthesis, but it cannot guarantee success. As an amputee who works with prosthetic users every day, I look at endurance, strength, overall health, and rehabilitation needs before recommending a fitting.
Supervised exercise can build capacity before fitting and walking practice begin. A simple tip you can start today is a seated sit-to-stand test: count how many times you can rise from a chair and sit back down in 30 seconds without using your hands. Keep a log each week, and share the results with your prosthetist and physical therapist so they can track your progress.
What Does a 30-Watt Arm-Ergometry Result Mean for Vascular Amputees?
A 30-watt arm ergometry result suggests your heart and lungs may have the capacity for successful prosthetic use, but for vascular amputees it is a clue rather than a guarantee.
Think of it as a snapshot of cardiac workload, since walking on a prosthesis typically demands more energy than walking on two natural limbs.
An arm ergometer test loads your upper body on a hand-cranked machine, so the watt number reflects cardiovascular reserve rather than leg strength.
Practical tip: ask your rehabilitation team to record your heart rate and perceived exertion at the moment you reach 30 watts.
Bring that log to your prosthetist and physical therapist so they can judge readiness with your full picture.
How Soon Should Rehabilitation Begin After Receiving My Prosthesis?
Rehabilitation should begin within five working days of receiving your prosthesis. I started my own training in that window, and I recommend the same timeline for most people.
Early sessions focus on gait training under clinical supervision, so your team can correct movement habits before they set in. Walking time should increase only after the fit has been checked.
Skin tolerance is the best guide for progression: check your residual limb after each outing, and shorten sessions if redness lasts longer than 30 minutes.
Keep a simple log of wear time and skin changes. Bring it to every appointment so your team can adjust the socket fit.
Should I Use a Walking Aid While Learning to Walk With a Prosthesis?
Yes, using a walking aid while learning to walk with a prosthesis is a smart way to load your limb safely and build confidence. A walker, crutches, or parallel bars let you shift weight onto the socket gradually, so your balance and gait can develop without falls.
Start with short practice sessions on level flooring, using the aid for support during each step. Keep your hands relaxed and your hips level, and rest between sets to protect your residual limb.
Ask your prosthetist and therapist to check socket fit, skin condition, and how well you tolerate a stump shrinker during training. Report redness, blisters, or pressure marks the same day so adjustments can be made quickly.
Can Supervised Exercise Improve My Fitness After Amputation?
Yes, supervised exercise can meaningfully improve your fitness after amputation. Studies report higher VO2max after just six weeks of structured training.
Start slowly and progress gradually, adding a few minutes or one extra repetition each week so your residual limb and heart can adapt. Ask your prosthetist to check socket fit before every session, since a loose or pinching socket is the most common reason people stop training.
Sensory feedback drills and phantom limb management also help, especially when they are part of your prosthetic rehabilitation plan. Track your tolerance with your clinicians so gains last and your body stays safe.
Rounding Up
I’d treat a limp as a signal, not a failure. Start with a comfortable socket, steady weight shifts, and short, supported walks, build time only when your steps stay controlled. A prosthetist can check fit and alignment, whereas a physical therapist can spot habits I can’t fix by stubbornness. Think of gait practice like tuning a radio, adjustments bring the signal into focus. If pain, skin changes, or worsening balance appear, call your care team.